Preparing a Dolly or Pull Stub for Test
Whilst there are a number of different types of gauges and dollies available to meet specific applications or test standards, setting up an adhesion test for all styles and gauges is very similar.
Condition of the Dolly
The contact surface of the dolly should be flat, undamaged and perpendicular to the shaft of the dolly. In all cases, the area of the surface should be consistent with the test requirement. Any rounding of the edges of the dolly or damage “kinks” will affect the surface area of the test, thereby greatly affecting the adhesive test result.
The typical size used in adhesion tests is 20mm diameter although other sizes are commercially available, including 10mm and 50mm. The size of the dolly will determine the pulling range of the adhesion tester. The 50mm dolly is used mainly for concrete.
Dolly Contact Surface
In order to achieve the correct dimensions each dolly is precision engineered, leading to a smooth finish to the contact surface of the dolly. To provide a good key for the adhesive, the dolly should be roughened. To do this, an abrasive pad or sandpaper should be placed onto a flat surface and the dolly contact surface rubbed across it, making sure that the abrasive does not damage or round the edges.
The dolly should then be cleaned of any dust and degreased. In some instances, the dolly can be roughened by gentle blasting of the surface. Again, care should be taken to ensure there is no rounding to the edges. If a dolly is being re-used, users should ensure that all pre-existing coatings and glue are removed from the dolly’s surface prior to applying fresh glue.
In addition to the dolly preparation, the coated surface should also be lightly abraded and cleaned to ensure it is free from oil, grease, moisture and dust enabling a good bond between the dolly and coating.

Applying the Glue and Securing the Dolly

Apply an even film of glue to the prepared contact surface of the dolly. Place the dolly onto the prepared coated surface and apply an even pressure to the dolly to squeeze out air and any excess glue. The excess glue should then be removed from the dolly.
When using twin pack glue, a small quantity should be mixed according to manufacturer’s instructions (twin component epoxy glues should typically be used within one hour of mixing).
As push off adhesion test dollies have a central hole, when using low viscosity glues, the adhesive plug should be inserted prior to placing the dolly on the surface. This ensures no glue fills the hole when being applied. The plug should then be removed before the glue cures. The Elcometer 108 includes a tool and plug in the kit for ensuring the hole is free of cured glue.
Glues cure at different rates and at different temperatures. When fixing dollies to vertical surfaces it is essential that the dolly is held in place for the duration of the cure, either by using a magnetic dolly clamp (ferrous substrates only) or tape, making sure the dolly remains flat on the surface.
To Cut or Not to Cut?
The question regarding whether the coating around the base of the dolly should be cut or not is a continuous debate. Whilst it is necessary to cut the coating around the dolly when the lateral bonding in the coating is greater than the expected adhesion (elastomeric coatings, for example), many argue that all coatings should be cut in order to remove the lateral effect entirely. Others argue that the very nature of cutting the coating could create micro-cracks and fissures under the dolly surface, thereby affecting the result.
It is important to be consistent when deciding whether to cut or not. Not only should the same type of adhesion tester be used and recorded throughout the inspection, but whether the coating is or is not cut should be applied across all the inspection and recorded accordingly. Similarly, the glue type should be recorded and used site wide.
Selecting a Glue
Twin pack epoxy glues stick to aluminium and stainless steel. Cyanoacrylate glues do not stick to aluminium as effectively, but are quick to cure and ideal for stainless steel dollies such as those used with the Elcometer 108.
Glues come in varying strengths; the user should choose glue that is suitable for the expected adhesion of the coating. In some instances, no glue exists that has an adhesive strength greater than the coating/substrate bond (flame sprayed or thermally sprayed coatings, for example). Therefore it may be required to place the dolly directly into the coating before it cures.
Some glue may have an adverse effect on the coating, chemically altering it, in a similar way to the wrong glue melting the plastic models we built as children.
Dolly Alignment and Positioning
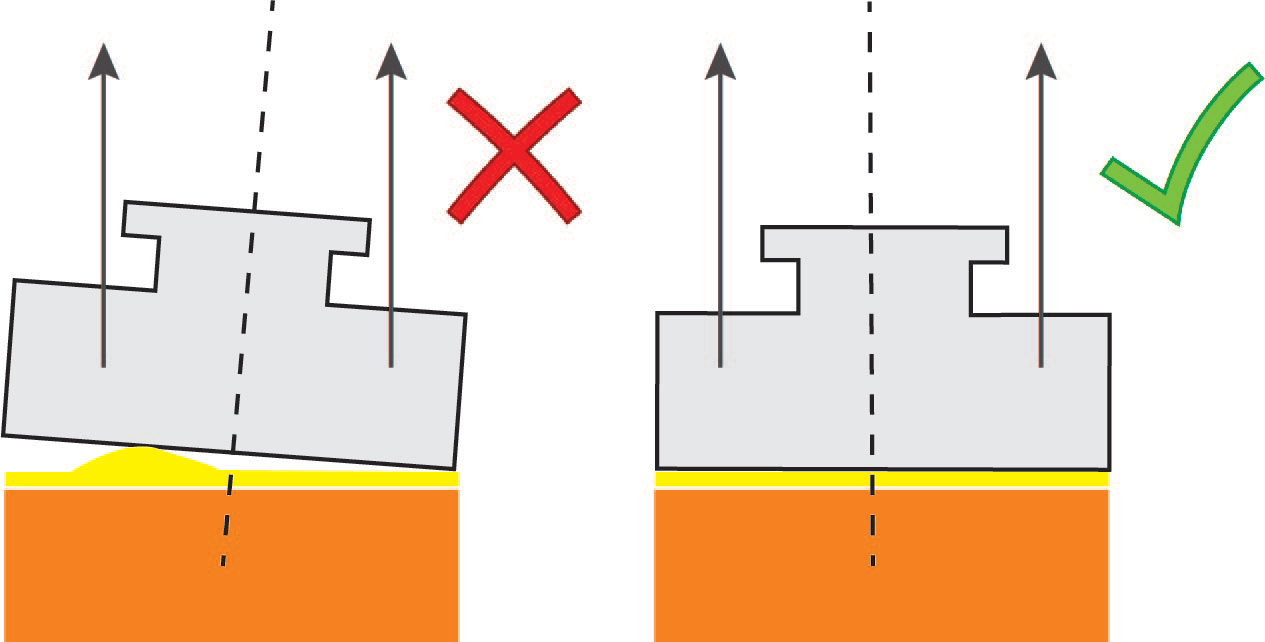
It is imperative that the dolly is situated on a flat surface, with sufficient area surrounding it to allow the gauge to also sit flat to the surface around it. Positioning a dolly over a ridge or weld is inappropriate as the adhesive test requires that the dolly is removed perpendicularly to the substrate.
There are “self- alignment” methods to ensure that the dolly is pulled off the surface of the substrate. However, unless the dolly and the actuator are perpendicular to the substrate the actual pull will not produce an accurate result.
If we take the example in the diagram, pulling the dolly on the left in the direction of the arrows will effectively peel the dolly off the surface. This will not adhere to any of the relevant Standards. The area of the surface where the dolly is adhered is not suitable to be tested if, as in this case, the dolly cannot be fixed flat and perpendicular to the coated surface.